


Transitions and steps can be connected to a screen element from directly within the Automation Workflow Wizard.
To connect a transition to a screen element in the Automation Workflow Wizard:
| 1. | In the upper pane of the Automation Workflow Wizard window, select the transition to connect to a screen element. |
| 2. | Verify that the screen element you want to capture is displayed on the screen, and then click the Screen Element  button. button. |
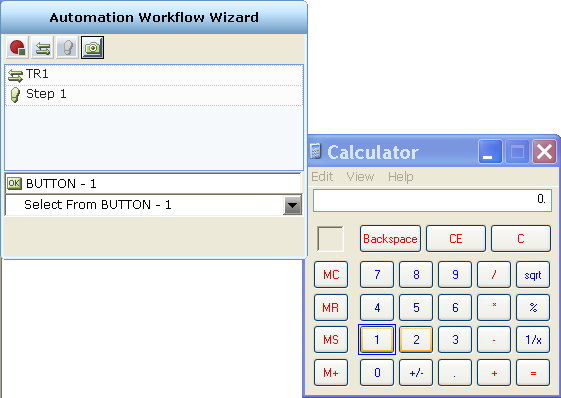
| 3. | Capture the screen element in the standard manner, as described in Capturing a Screen Element.The captured screen element is shown in the edit box in the Automation Workflow Wizard window. It represents the screen element to be connected to the transition. In the example below, the 1 button on the Calculator was captured. |

Each screen element type is identified by a different icon. For example, the  icon indicates that the screen element type is a button. Events are identified by the
  icon. Each property type is identified by a different icon.
After you select the property or event to connect to the screen element, its name is displayed below the edit box. Once you have made your selection, no further changes can be made to the transition.

Let’s look at another example that involves selecting a property instead of an event for the transition. For example, if you select the Enabled property for the Button - 1 screen element, then a condition editor opens in which you select the operator to be used for the compare.

When you select a property, such as the Enabled property in this example, you must specify a comparison object. The property comparison condition must be met in order to trigger the transition.
When you select an event as the trigger for the transition, as described on Step 4, if the event occurs, then the transition occurs.
To connect a step to a screen element in the Automation Workflow Wizard:
| 1. | In the upper pane of the Automation Workflow Wizard window, select the step to connect to a screen element. |
| 2. | Click the Screen Element  button. Before clicking this button, be sure that the screen element that you want to capture is displayed on the screen. button. Before clicking this button, be sure that the screen element that you want to capture is displayed on the screen. |
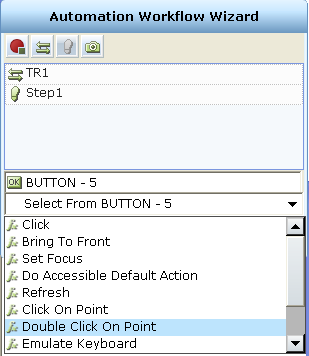
| 3. | Capture the screen element in the standard manner, as described Capturing a Screen Element. The captured screen element is shown in the edit box in the Automation Workflow Wizard window. It represents the screen element to be connected to the step. In the example below, the 5 button on the Calculator was captured. |

| 4. | Define the action for the step. To do so, click the down arrow in the drop-down list below the edit box, and then select the function or property to assign to the screen element. This drop-down lists all the functions that are relevant to the screen element as well as the properties whose values you can change (assign). For example, in the window below, the Double click Point function is selected for the Button - 5 screen element. |
After you select the property or function to assign to the screen element, its name is displayed below the edit box.
If you select a function, that function must be invoked. Invoke the function using the fields at the bottom of the window using standard methods. For example:

If you select a property, that property must be assigned. Assign the property using the fields at the bottom of the window using standard methods. For example:
